Black Walnut, Juglans Nigra
It doesn’t take long to discover the dyeing qualities of Black Walnut…just pick up a few broken hulls after a Fall windstorm and you’ll find your hands immediately turning brown. Or some scour at the look of hulls breaking down underneath the trees. It’s true it appears like some fecal matter that exploded from an infant’s upset stomach, but that’s beside the point. Black walnuts have been used for centuries as a source or dye, bark tanning solution, food and medicine. It’s no wonder why they are such a hot trading commodity in the primitive skills community.
Before I get to writing about making a Dye or Bark Tan solution, I want to address the process of harvesting and processing these lovely nuts.
Identification:
Walnut is a deciduous tree that can grow up to 100 + ft tall. The bark is black to dark grey. The large tree has long, pinnately compound leaves with toothed margins. There are generally 9-11 leaflets that are nearly opposite and the terminal leaflet is often reduced or absent. I have commonly found walnut near old home sites in various parts of the Western U.S.
Harvest:
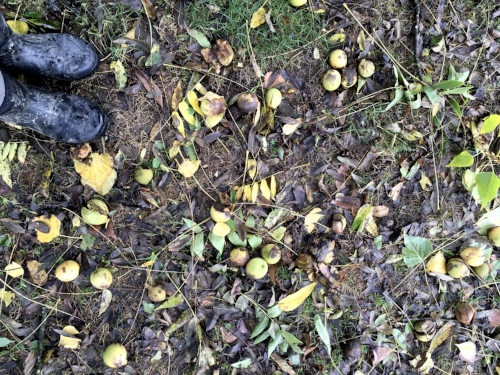
Come early to mid-October, you might want to be aware of which tree you are standing under (especially during high winds), leaves, branches, nuts and buds are falling from our deciduous friends and cones are falling from the conifers. It’s the time to harness your inner squirrel and start collecting.
Black Walnut trees can fool the untrained plant identifier’s eye. The large hulls* grow bright green before falling onto the ground. It isn’t until the hulls break down, that we can see the common image of a walnut shell. And it isn’t until the shell is broken that we can find the creamy nuts that we readily consume over the wintering months. But if you are harvesting for the Dyeing purposes, don’t let the hull break down too much…
*(some refer to this part of the walnut as a “husk”, I learned them to be called “hull”)
Black Walnut hulls can be collecting from the tree or the ground. In my experience, I wait to harvest nuts and buds when they have fallen to the ground. It is within that short window where I find the hulls to be more readily available to peel off the shell and if I were to eat the nut, the protein dense food source is also about ready to be eaten at this point.
*(Walnuts can be collected in some areas as early as late summer and throughout the fall)
(In a nutshell)
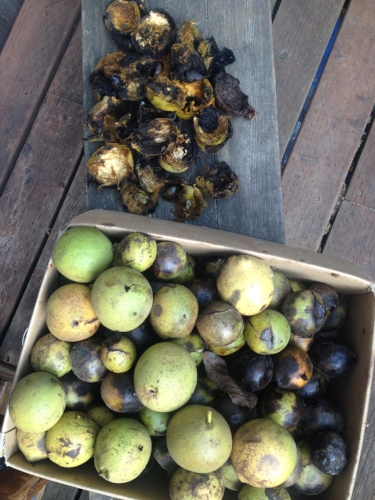
Ideal Hulls for Harvesting:
-Large, plump Hulls
-Slightly cracked Hulls
-Borderline “mushy” (a.k.a not super hard and smooth, bright green hulls)
What do I leave for the squirrels:
-Hard, solid green hulls
-Super mushy black hulls
-Hulls still attached to trees
When harvesting I wear gloves so I don’t stain my hands, but ideally the hulls won’t be opened to the point where they start turning brown (hence staining your hands). I harvest into a box or heavy duty bag. I only take enough walnuts to barely impact the density of nuts underneath the tree, this allows for the resident creatures that depend on the tree as a food source to get through the winter.
Processing:
Boy oh boy, do I process a lot when sitting with my freshly harvested walnuts! Like with processing most plants or animals, it becomes a meditative, spiritual practice. Well, you begin a deeper relationship with whatever you are working with. In this case, you are unfolding the layers of a walnut.
The Layers:
The outside skin of the Hull (Exocarp) -The soft protective covering of the shell and nut
The fleshy inside of the Hull (Mesocarp)
The Shell (Endocarp) -The hard part that protects the seed/edible nut
The Nut (Seed) -The seed that is edible and also is the source of regeneration for the tree.
Processing is a messy task, so I tend to wear rubber gloves. I use a full knife or sharp stick and cut the hull’s circumference (circumcising the hull). I then twist both sides (as if I am twisting apart an Oreo) and pull them apart. This way I get two well intact halves of the hull. As soon as you break open the hull, it becomes exposed to oxygen and oxidizes, turning brown. Once I half the hulls I lay them face down on a massive window screen (or drying screen). I place this screen in a drying room or above my wood-fire stove).

You can also leave them outside for a productive squirrel to find and take the hulls off for you. And it might leave something a bit more messy like this...
To efficiently dry the hulls (to store and use for a later dyeing or bark tanning project), I take them off the drying screen and lay them onto a baking tray. I place the trays into my oven turned to 170 degrees Fahrenheit, leaving the door cracked. I flip the hulls every hour or so until they are crispy dry.

Photos by Rachael Witt

If you are going to make a fresh dye solution, go to our write-up on making a Black Walnut Dye or Bark-Tan solution. In this case, you do not have to dry the hulls out for storage :)